
Stenciling on audio cassettes: technique, constraints and learning
Stenciling on a wall or canvas is one thing. Stenciling on assembled audio cassettes is quite another. The surface isn't flat, every gear is a potential pitfall, and poor centering can ruin hours of work. Here's how I work and what I've learned on my own.

Stenciling on Audio Cassettes: Technique, Constraints, and Learning the Craft
Stenciling is an ancient technique. From the walls of Pompeii to the streets of Bristol, it has traversed the centuries without truly changing its principle: a cut-out mask, paint, a surface—simple, in theory. In practice, everything depends on the surface. Working on assembled audio cassettes is not the same as working on a canvas or a wall. The cassette is a technical support, not a flat one. It has textures, gears, and recesses. Each cassette is slightly different from the others. When you assemble nine, thirty, or 336 cassettes to compose a portrait, you are working on a topography, not a surface. This completely changes the stencil technique.
The Stencil Material
For a stencil to adhere to this type of surface, you need something thin and flexible that follows the contours without peeling off or allowing paint to seep into places it shouldn't. I use rolls of very thin white paper. Not rigid mylar, not cardboard, something that adapts. It's a detail that seems insignificant, but it isn't. A stencil that's too rigid on a cassette will cause the edges to lift, the paint to migrate, resulting in a ruined portrait.
The Layers
A portrait on cassettes can require a few layers or dozens. It depends on the subject, the level of detail, and the lighting I want to achieve. There's no fixed rule. Each new layer refines, clarifies, and adds depth. And each layer is a risk; one slip, one poorly applied pressure, and the whole thing collapses. That's why the drying time between layers is non-negotiable. Trying to rush a multi-layered portrait is the best way to have to start all over again.
The Mistake That Ruined Everything
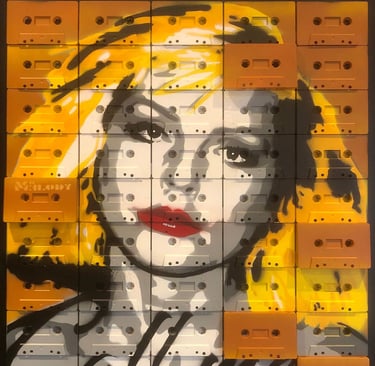
There's one mistake that keeps recurring: poorly centering the face on the cassette's gears. On a flat surface, centering a face is a matter of measurement. On assembled cassettes, the gears are there, visible, in the middle of the casing. If an eye falls on a gear, if the mouth is cut off by a poorly anticipated contour, the entire gaze is lost. The portrait loses its power instantly. I've redone entire pieces for this kind of detail, not out of perfectionism, but because it simply wasn't working.
How I Learned
I didn't have any formal training. I learned on my own, by devouring documentaries and reading a library of art books that has grown over the years. And by making mistakes—a lot at the beginning, less so now, but it still happens. This way of learning has one advantage: there's no bad method inherited from a teacher. Everything I do, I've tested, abandoned, or kept because it worked on that specific medium, not on some theoretical canvas. The downside is that there's no one to call when something doesn't work. You search, you start again, you find it.
What stenciling brings to this medium
Stenciling on cassettes creates a visual tension that other techniques don't have. The clean lines of the stencil against the mechanical texture of the cassettes. A human face superimposed on an industrial object. This contradiction is at the heart of what I'm looking for: something precise on something imperfect.
Perhaps that's why it works.
Home
Gallery
The artist
Workshop journal